Course Reserves for Instructors
Help your students borrow books for free!
Materials for your class can be set aside at the library for students to borrow for free, lessening the amount of materials that must be purchased each quarter. Instructors may choose to place books, media, articles and more on reserve for their students.
Course Reserves and the Equitable Access Program
A Course Reserves reading list works alongside the campus Bookstore’s Equitable Access program and Bookshelf.
Currently, Course Reserves provides access to digital copies of course materials available to enrolled students (Shields Library only). While the EA program provides low-cost access to required course materials, the reading list provides no-cost access to both required and recommended course materials.
Benefits of Course Reserves
Course Reserves reading lists are accessible from the Canvas course site. Reading lists collect all required and recommended resources into a single, searchable location. Students can:
- View and download digital content
- Request physical materials
- Read special notes regarding access
- Mark readings completed
- Like favorite readings
- Discuss readings with other
Getting Started with Course Reserves
Online instructions are available to assist you in creating and submitting your Course Reserves reading list. Instructions are designed so that you can go directly to the specific information needed or for you to click through and learn the entire process. If you review the online instructions and still need help, please contact Course Reserves staff for additional assistance.
Course Reserves reading lists allow your students to view all materials you’ve placed on Course Reserves at the UC Davis Library. These materials will have limited loan periods, maximizing access for all students and reducing their out-of -pocket expenses. These items may also be borrowed by you as the instructor for longer loan periods for classroom prep and instruction.
Step 1
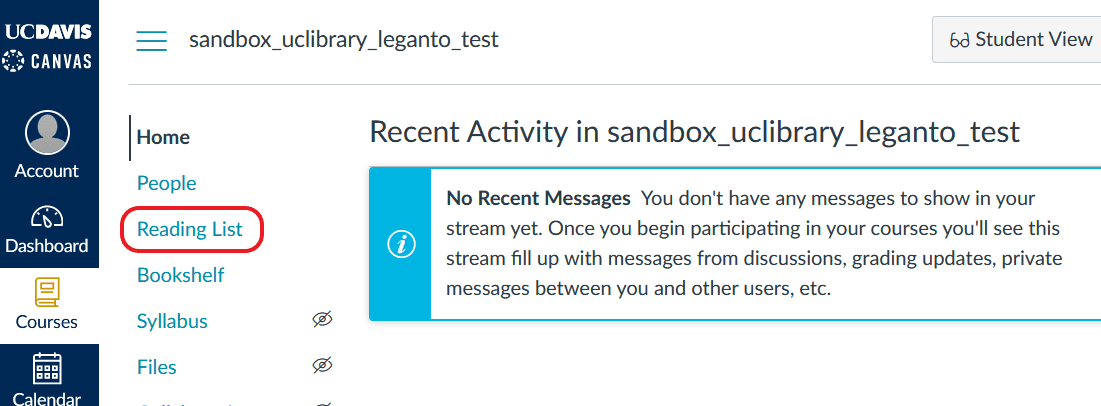
Log into your Canvas course site (be sure to double-check the term) and select Reading List from the Navigation Menu. Your Reading List option may not appear in the same order as in the example provided below.
Step 2
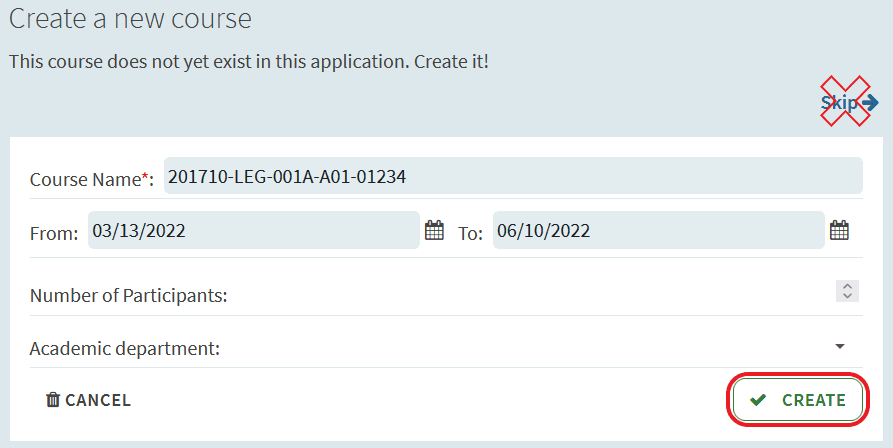
Click Create on the first splash page. It is important that you do not “skip” this step. While the course itself exists in Canvas, this sends the course information to the library. Do not update any information on this page; automatic scripts will fill in the dates and other information.
Step 3
Click Create It.
Step 4
You may choose to give your reading list a new name (Title) or leave as the system default. Click Create.
Step 5
Select the Basic Template (Best Practice). Templates provide the structure for your reading list; all templates are fully customizable. If you have a favorite organizational structure for your reading lists that’s different from our Basic Template, you can Save [that] list structure as a template for future use, simply select this option from the Edit drop-down menu on the next/main landing page.

Step 6
You’re ready now to Add items to your reading list!
Now that you’ve created a Course Reserves reading list, you’ll want to add items to the reading list. Items can be anything you want: books, DVDs, electronic articles, website, PDFs, etc. If you don’t find what you’re looking for by searching the library catalog and databases, you may create the item manually. Library staff will verify holdings and, if approved, purchase necessary material. Reading lists should contain no more than 15 citations.
Step 1
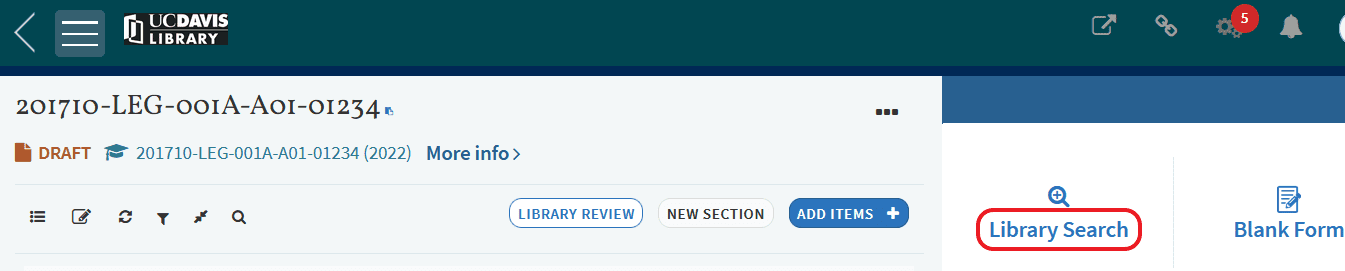
Click Add Items to open the searching options.

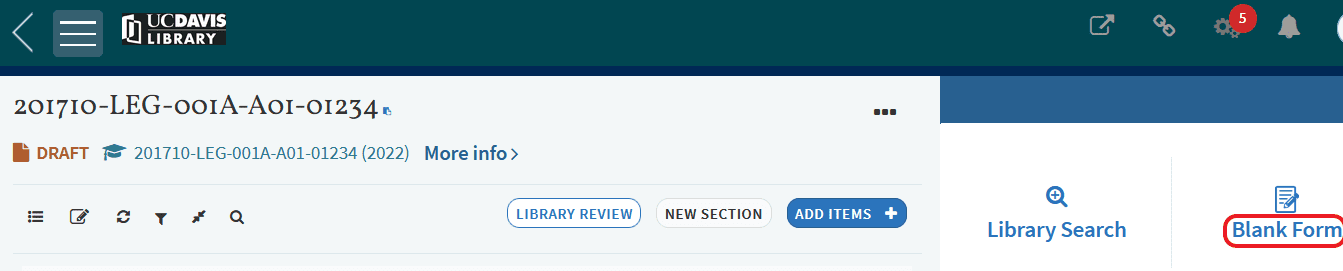
Step 2
Click Library Search and enter your search term(s) to search library holdings.
Step 3
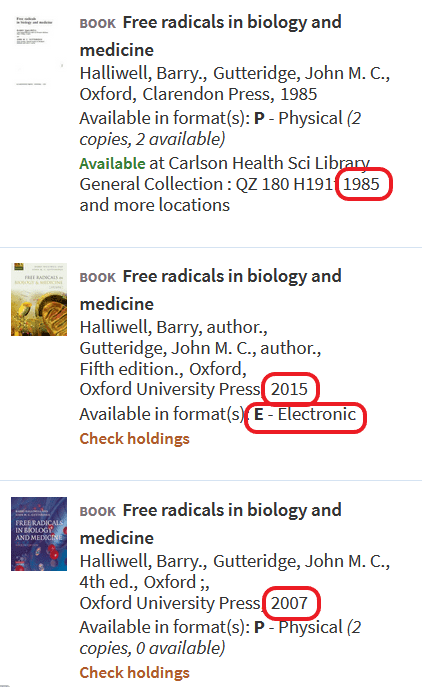
Locate the item in the search results.
• Please pay close attention to the edition. The library will process whichever edition you select, even if a newer edition is available.
• If there’s an available e-book, please select that option.
Step 4
Click the title/edition that you want to add to your reading list.
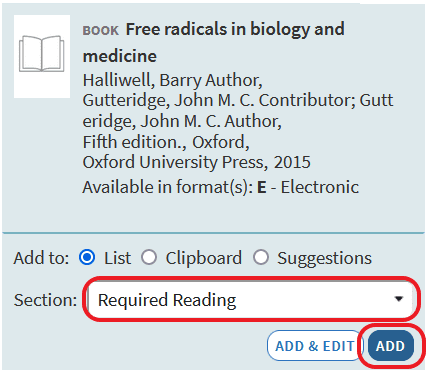
Step 5
Select the reading list Section you want from the drop-down menu and click Add.
Step 6
Enter information about the item you’d like to add. At a minimum, Title and Type is required. However, additional information such as author, ISBN, edition, etc. may be necessary to identify the correct item. If you’re adding a PDF, you will be able to drag-and-drop or browse for the file from this screen.
Step 7
Select the reading list Section you want to add the item to from the drop-down menu and click Add.
Step 8
Once you’ve added items to your reading list, you may want to add Tags or Notes to some or all of your citations. This is a completely optional step. When you’ve finished building your reading list, you’ll need to send it to the library, so that library staff can begin processing the reading list.
Tags notify library staff when you want to do something “unusual” with a citation, such as request an extended loan period or indicate how the library should manage personal copies of items that you plan to bring in. Notes contain information that you may choose to make Public to your students or keep Private for yourself.
Step 1 (Tags)
Locate the item that you want to add a tag to.
Step 2 (Tags)
Click Add Tag.
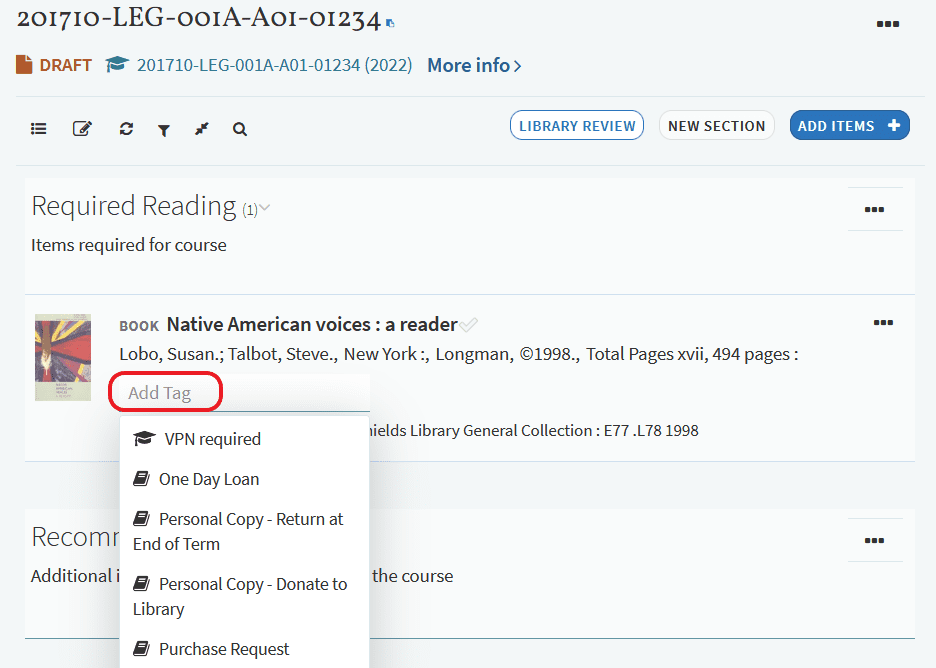
Step 3 (Tags)
Select the tag from the drop-down menu; repeat as needed. Jump to Step 7 if you aren’t adding Notes.
Step 4 (Notes)
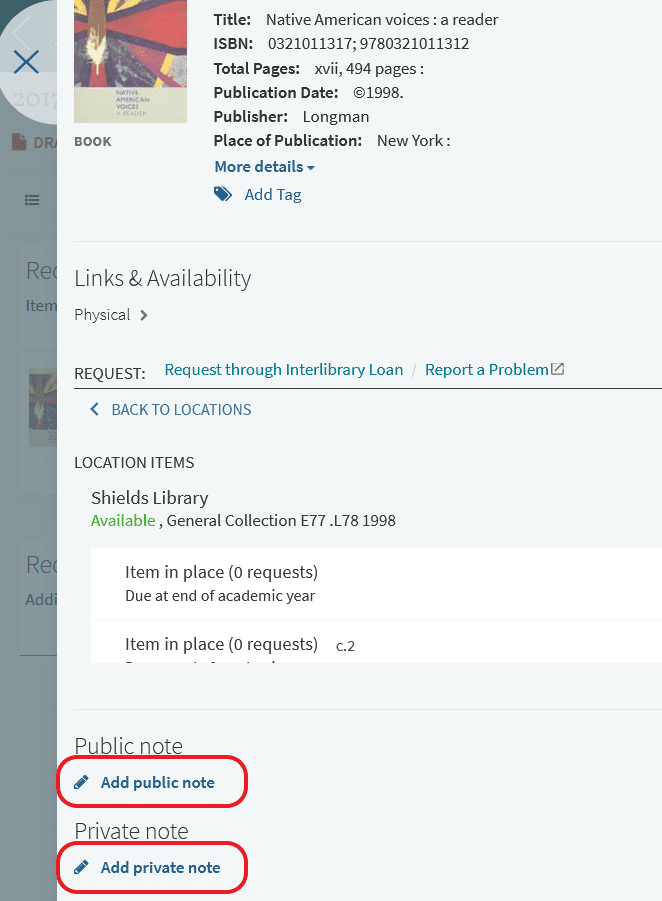
Locate the item that you want to add a note to and click anywhere on that citation to open the detailed view.
Step 5 (Notes)
Scroll down to the Public note (viewable by your students) and Private note (viewable by yourself) fields, decide which type of note you’re entering, and click Add [public or private] note.
Step 6 (Notes)
Type your note and click Save.
Step 7
Once you’ve finished adding tags and notes to your reading list you’ll need to send it to the library, so that library staff can begin processing the reading list.
Library staff will not begin work on a reading list until it’s been submitted to the library. Until that happens, we consider that the list is still “under construction” and not yet ready for the library to work on. If you’ve added a citation to an already-submitted reading list, jump to Step 3 below.
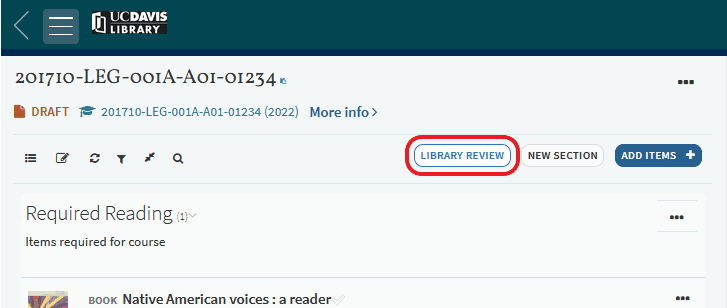
Step 1
Click Library Review to send the entire reading list to the library.
Step 2
That’s it! Library staff will process the reading list so that items will be available to students as quickly as possible. If there are any problems or questions about the reading list, library staff will contact you. Otherwise, you may follow the progress of the reading list in Canvas; a glossary of processing terms is available in the FAQ below.
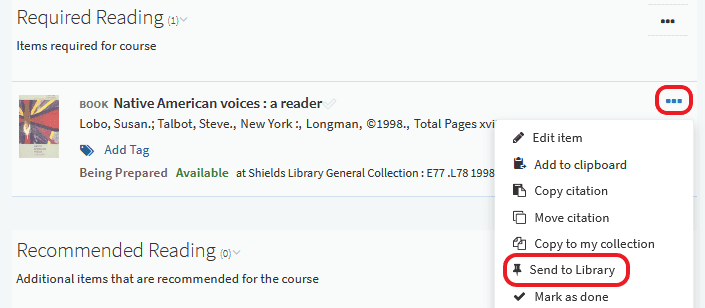
Step 3
Click the Options menu (… icon) located next to the newly-added item’s title and select Send to Library from the drop-down menu.
Step 4
Again, that’s it! Library staff will process the reading list so that items will be available to students as quickly as possible. If there are any problems or questions about the reading list, library staff will contact you. Otherwise, you may follow the progress of the reading list in Canvas; a glossary of processing terms is available in the FAQ below.
Users must be authorized as the Teacher, TA, Lead TA, or Designer for a Canvas course site in order to create or edit a Course Reserves reading list for that course.
Step 1
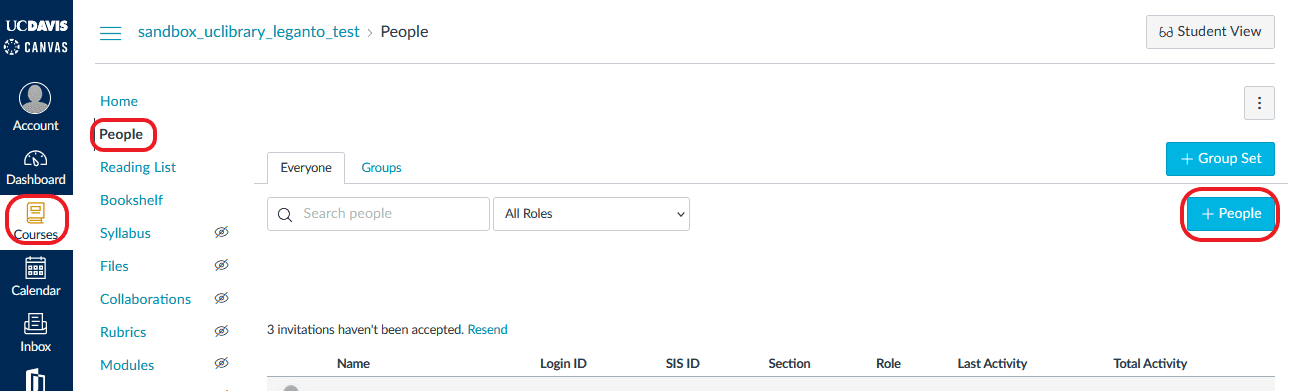
Log into your Canvas course site (be sure to double-check the term) and select People from the Navigation Menu. Your People option may not appear in the same order as in the example provided below.
Step 2
Click +People.
Step 3
Add user(s) by their UC Davis email address, campus login or SIS ID.
Step 4
Select Role and course Section (if applicable) from the drop-down menu.
Step 5
Click Next
Step 6
Click Add Users
Lists from previous terms may re-used in subsequent quarters. If you would like to re-use a previous reading list but are having trouble locating it, it may have been archived; please contact the library staff for assistance. If you know you will be re-using a particular reading list in future classes or terms, a best practice is to export and save the reading list to your computer at the time of creation to avoid any issues with archiving.
While there are multiple ways to export/import your reading list, the library advocates for using RIS files exclusively.
Export an RIS File
Step 1
Log into your Canvas course site for the term with the reading list you wish to re-use and select Reading List from the Navigation Menu.
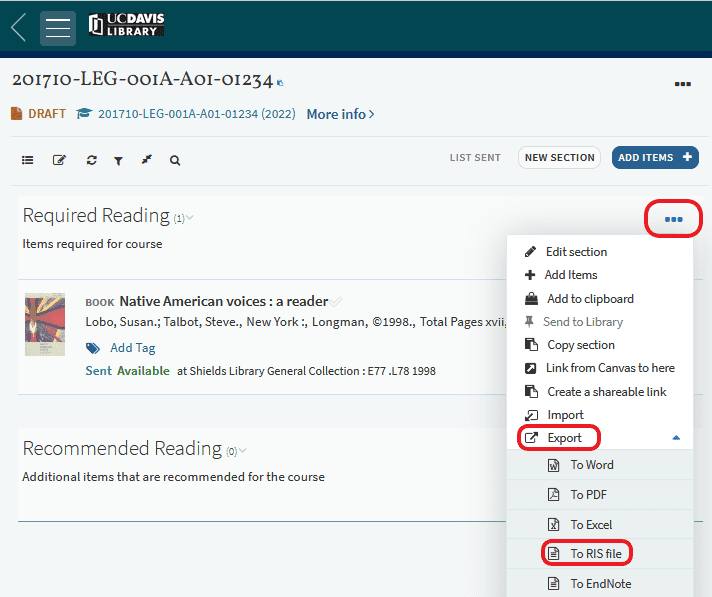
Step 2
For each reading list section that you would like to export and save, go to the options menu (… icon) located next to the section header and select Export > To RIS file.
Step 3
Click OK to Save File on your computer. You may want to rename the RIS files to simplify management, especially if you are exporting multiple files.
Import an RIS File
Step 1
Follow steps 1-5 as noted in the Add Items to a Reading List section above.
Step 2
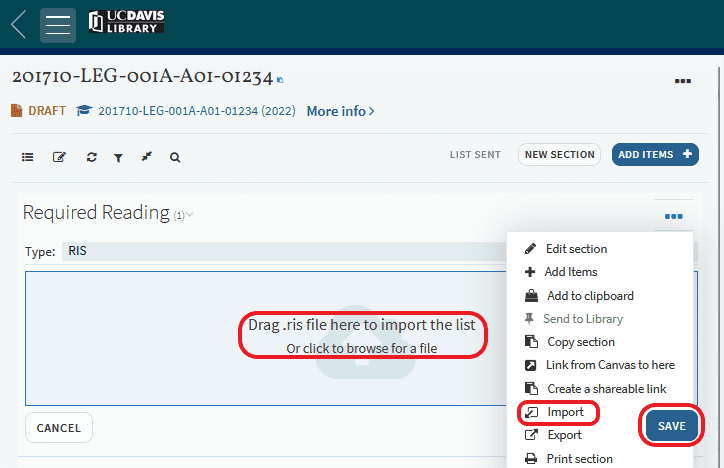
For each of the reading list sections that you are importing into, go to the options menu (… icon) located next to that section header and select Import.
Step 3
Drag-and-drop or Browse for the RIS file.
Step 4
Click Save.
Step 5
Review reading list section names and items carefully and update information as necessary to remove items that you no longer use or add new items. Tags and Notes don’t transfer, so be certain to add these if needed.
Step 6
Once you’re satisfied with your reading list you’ll need to send it to the library, so that library staff can begin processing the reading list.
Frequently Asked Questions
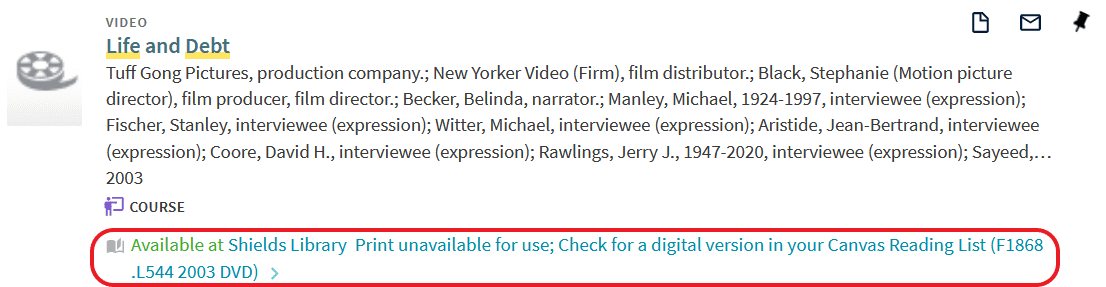
During campus COVID-related restrictions and through Summer 2022, Course Reserves are provided 100% digitally. (Shields LIbrary only)
Titles that are submitted on a Course Reserves reading list are automatically reviewed for library e-book holdings. If an e-book is available, it will be linked to the reading list for students to access directly from Canvas. If off-campus, users will first need to authenticate themselves via the library VPN to access this material.
If an e-book is unavailable or cannot be purchased, the library will automatically digitize content from the physical material. A PDF, accessible only by the instructors and students enrolled in the active course, will be added to the Course Reserves reading list. Users may only access this file by logging into Canvas and navigating to the course’s reading list. Instructors do not need to request digitization services, as this is the current standard practice.
Please note that the library cannot digitize multiple editions of the same title; only the most current edition added to your Course Reserves reading list will be digitized. While a title is on active Course Reserves, the physical copies will be held in a closed collection and are not accessible.
Course Reserves reading lists will be processed in the order received. Reading lists may take up to three weeks to process due to peak workload constraints, delays in retrieving loaned materials, or purchasing new material. While reading lists are accepted throughout the year, to ensure Course Reserves materials are available to students by the beginning of classes, reading lists should be received by:
- the second Friday of August for Fall Quarter
- the second Friday of November for Winter Quarter
- the second Friday of February for Spring Quarter
- the second Friday of May for Summer Session
Deadlines for the professional schools may be earlier, depending upon the start date of their terms.
Yes, reading lists should not exceed 15 total citations. If your reading list exceeds this limit, you may be contacted to prioritize or amend your reading list and not all citations may be digitized.
Digitizing materials is labor-intensive and time-consuming task. Limiting the number of citations per reading lists allows us to provide necessary materials to the greatest number of courses and students possible.
Course Reserves regularly receives hundreds of reading lists each quarter, amounting to several hundreds more of citations. Reading lists and citations are processed in the order that they were received. If the title has been previously digitized, the PDF is generally available within 1-2 business days. If not, it will go into the queue for digitization. Additional delays may happen if the item is not-owned, on loan, missing or damaged.
Course Reserves are processed and located at either Shields Library or the Blaisdell Medical Library.
Items needed for courses beginning with the following course codes will be processed and housed at the Blaisdell Medical Library:
ANE | BCM | CAR | CHA | DER | EMR | ENM | FAP | GAS | GMD | HON | HPH | ISI | IMD | MDS | MHI 200 series | MMI 300-400 series | NEP | NEU | NRS | NSU | OBG | OPT | OSU | OTO | PAS | PED | PHA | PMD | PMR | PSU | PSY | PUL | RAL | RDI | RNU | RON | SUR | URO
If the material that you need is on an active Course Reserves reading list that you submitted, you are welcome to borrow the item for for up to two weeks for classroom prep and use. Please be aware that this material could be recalled.
If you know in advance when you’ll need these materials, you may place a booking request on the item:
Step 1
Locate the citation you’d like to book in UC Library Search
Step 2
Click the holdings link to view more details and request options; you must be signed in to your library account to see available request options.
Step 3
Select UCD Request and enter the date and time range when you’d like to pick-up the material (Ex. June 1, 9:00am-10:30am). Click Send Request when finished.

Copies of personally- or departmentally-owned materials may be placed onto Course Reserves under certain conditions:
- The library owns a copy that is lost or missing or has ordered a physical copy that’s not yet received. In this case, the personal copy will be digitized and returned unless it has been donated to the library.
- The library doesn’t own a copy of the book and will not order i In this case, the personal copy will be digitized only if it has been donated to the library.
The last name of the owner or owning department should be written on the inside front cover of all personal copies that will be returned. Personal copies must be picked up within one month of the end of the term otherwise they will be treated as donations to the library. The library does not store materials for future quarters.
When you upload files to the Course Reserves system, you’re certifying that your use of the uploaded files is compliant with copyright law. Generally, this will mean one of the following is true:
- uploading the files for use in your course is fair use;
- you have received permission from the copyright owner;
- the uploaded item is not protected by copyright or is in the public domain; or
- you own the copyright.
For assistance in understanding copyright restrictions and how to confidently rely on fair use, please consult the materials on the UC copyright website or get expert help from the library’s scholarly communications program by messaging scholcomm@ucdavis.edu.
The Course Reserves reading list supports three kinds of notes: Public, Private, and Library Discussion. A Public Note will display in the reading list and anyone with access to the course site will be able to read it. A Private Note is viewable only to the instructor, TA, or course Designer. To create or edit these notes, you’ll select the appropriate citation and scroll down to the the different notes fields. The Library Discussion link allows you to direct message Course Reserves staff and eliminates the need to call or email. Library staff can reply back using this same mechanism. Library Discussion is located in the right-side toolbar.
This is most likely the result of one of two issues: 1) one of the initial creation steps was skipped or 2) the reading list is associated with the wrong course.
The system will ask you three times if you want to create a Course Reserves reading list for the course. Some instructors choose to skip some parts of this initial creation; please don’t! These are necessary to link your course site and your Course Reserves reading list. If you skipped any of these steps, the link between the course site and the reading list is lost. Please contact Course Reserves for help with fixing this problem.
If the wrong course was selected — for example, Fall 2020 instead of Fall 2022— it’s easy to fix! Simply go to the older course and open the reading list there. Then,
- Click the Edit options menu (… icon) located next to the course information
- Select Manage course association from the drop-down menu
- Click the options menu (… icon)
- Select Remove this course from the drop-down menu
- Lookup [the correct] course and select from the auto-fill options.
- Click Associate & Close
This is an easy fix! Your library account is most likely missing a required field that’s needed for Canvas and the library computing system to communicate with one another. Please contact Course Reserves staff to let them know about the issue. Staff will be able to update your library account and usually get the system working for you in a matter of minutes.
Currently, physical lending of Course Reserves materials is only available at the Blaisdell Medical Library. Shields Library Course Reserves lending remains digital only.
The default loan period for physical lending is 2-hours, although instructors may request a 1-day loan by tagging the item in the reading list. If the material is on multiple reading lists, the shortest requested loan period will be used.
When looking at a citation in Canvas, a variety of terms are used to reflect the item(s) availability and where in the process of being moved to Course Reserves the item(s) is at:
- Available: Items are available to be checked out
- Being Prepared: This citation has not been sent to the library and is not currently being processed
- Check holdings: Items are not available to be checked out
- Complete: All copies that are being moved to Course Reserves of this title have been moved
- Complete-Digitization Declined: Digitization is unavailable for this title, either because the instructor has said it’s unnecessary or because the content cannot be scanned
- Complete-Pending Reply: The instructor did not reply to questions regarding this content. Library staff have ceased work on the citation; see “Instructor Contacted” below.
- Complete-Purchase Unavailable: The library is unable to purchase a print or electronic copy of this citation.
- In Process: Awaiting receipt of library copies of this item have already been recalled or paged from stacks or Acquisitions; some, but not all, copies may already be available in Course Reserves
- Inactive: This citation cannot be placed onto Course Reserves
- Instructor Contacted: Library staff are attempting to contact the instructor with additional questions about this citation; work on the citation is on-hold
- Needs Ordering: Item has been forwarded for purchase consideration and Course Reserves is awaiting that decision
- On Order-Electronic: The e-book is being purchased and we are awaiting receipt and activation
- On Order-Physical: The physical book is being purchased and we awaiting receipt and cataloging
- Pending Digitization: There is no available e-book and the physical copy is in the digitization queue, awaiting digitization. Materials are digitized in the order received
- Pending E-book Purchase Decision: Acquisitions staff are checking if an e-book is available for purchase or, if needed, a physical book
- Personal copies: The title is not owned and the library is awaiting receipt of instructor/department; pcs are processed in the order received
- Requested: Library copies of this item are being recalled or paged from stacks or Acquisitions
- Requested from NRLF: Library copies of this item are being recalled or paged from the Northern Regional Library Facility, on off-site storage facility serving all norther UC campuses
- Review Needed: Special processing or advanced expertise needed before proceeding with processing
- Sent: The instructor has sent this citation to the library and it is waiting to begin processing